Showing posts with label DIY. Show all posts

Wednesday, August 3, 2011

Backpacks on a Budget!! DIY: Back To School Edition

Parents, its that time of year again...The kiddies are heading back to school. Getting the kiddos ready to go back to school can be expensive; especially when you have to buy new wardrobes, uniforms, shoes and school supplies. This year I chose to shop around and compare prices. This time last year I spent $34.99 EACH on backpacks that started peeling around the 2nd quarter. This year we set a budget, which meant that I cut costs by 50%. I had to go to Office Depot, Walmart and Best Buy to get the rest of the things on the school supply list but by clipping coupons we saved a ton.


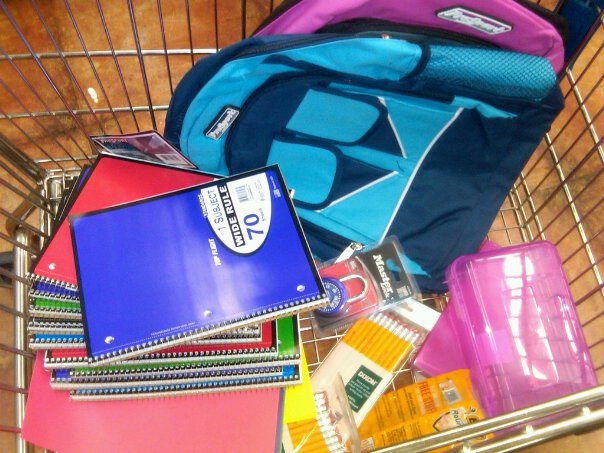
Back To School shopping at the Grocery Store.. Who woulda' thunk it?

 $6.99 each at the grocery store.
The blue one is for my 5 1/2 yr old...the pink is for my 12 1/2 yr old...

 Since I am the self-proclaimed IRON-ON Queen, we had some iron-on's already on  hand in our DIY box of goodies. These sheets were approx: $4.99- $7.99 each at Michaels Iron-On Transfers.


My little one cutting the pieces she wants on her backpack...


Ready for Kindergarten!!!


These backpacks have been transformed from basic to personalized which looks more girly and fun!! This works well for boys and girls, all ages!

Saturday, April 30, 2011

Vagabond Van...Eco-Friendly Fabulosity on Wheels!


Vagabond Van was born from a desire to dress in a unique way. Eclectic, colourful and one-of-a-kind, we offer clothes and accessories which are as individual as you are. Vagabond Van began as a mobile boutique, operating from a 1952 Flying Cloud Airstream caravan. The Airstream may be parked for now but the online shop is in top gear!
 

These one-of-a-kind earrings are made in Zimbabwe from cow horn and bone by an enterprising man called Joseph. He has invented a machine which helps him to carve and buff the horn and bone, bringing out the beauty of these natural materials and giving the earrings their polished finish. These designs are exclusive to Vagabond Van.


Fabulous, environmentally concious, eclectic threads! 

 "Our current collection hails from Africa and is infused with the creative spirit of this vibrant continent. Wherever possible, our products are made by hand. This helps to maintain, otherwise vanishing, traditional crafts and creates many more jobs, which in turn helps to keep communities self sufficient. The materials that we use are often ingeniously recycled, adding to the unique story which each piece has to tell and minimising its effect on the environment. "
Part of the Vagabond Van team is currently traveling the world, searching for new and extraordinary products. These come in all the time so keep checking the website for new stock or like their Facebook Facebook Page and be the first to know. You can follow their travels at The Vagabond Adventures.


Wednesday, April 27, 2011

Wordless Wednesday

"Earth Day 2011"

Monday, February 14, 2011

Valentine's Day::: DIY

I bought this little heart patch at Michael's for less than $5 bucks.. Its an iron-on that took about 3-5 minutes to make.

I bought this plain red Cardigan from Target, it needed some V-Day flair so I ironed on the sequined heart, Worked like a Charm!! .....I also added the red gem brooch that I purchased from Goodwill (Brand New) to my hat to spruce it up a notch. When my hair is looking crazy these hats always save the day!

Happy Valentine's Day ya'll!!!

Thursday, February 10, 2011

JUNK to FUNK:: Recycled TRASHION!

What is Trashion? It’s fashion, accessories, art, and crafts made from trash and upcycled and recycled materials.
This garment was created using 30 copies of the Financial Times


Believe it or not, this stylish handbag is made from hundreds of recycled aluminum pull-tabs. Yes, those tiny tabs we throw away without giving them a second glance after opening a can. Luckily, San Francisco-based company Escama Studio and various Brazilian crafts cooperatives have been working together since 2004 to create great fashion accessories from them. And their approach is personal: Each fashion piece comes with a tag bearing the signature of the person who made it. Customers can then click on that person’s profile on the company’s website to find out more about the artist. I love it!


Fashion made from recycled cassette tape string


These Tea Cup Bangles first surfaced on Twitter recently and demanded to be shared. They are made from real tea cups, adapted by designer Abigail MaryRose Clark.

Did you know??
**Each year, the average American throws away about 70 pounds of clothing each year and make up about 3% of our household waste. They end up in landfills and most don’t decompose.**


I blogged about these bangles a WHILE ago...they are made from recycled magazines. So fly! Check the archives for this post.


The Denim Kimono was created using recycled denim jackets and jeans.
gary harvey, runway, greenshows


Gary Harvey is the former Creative Director of Levi Strauss and Dockers Europe designer for Levi's. He began designing his environmentally friendly dresses during a freelance fashion campaign. He needed something dramatic for a shoot so he took 42 pairs of Levi's 501's and made them into a dress. He has continued designing eco-fashion since.


He doesn't just recycle clothing to make his innovative designs. This dress was made with cans, bottle tops and cardboard boxes.

~~~~~~~~~~~~~~~~~~~~~~~~~~~~~~~~~~~

Source(s) :::: The Trench Coat Is Dead.Long Live the Trench Coat (Dress)!

EnvironmentalGraffiti.com & Treehugger and Telegraph

You can check out the philosophy and some of the work of these artists here.

Thursday, February 3, 2011

First attempt::: Straightening my Hair since the BC!!!


Deep Conditioned/Hot Oil Treatment..


Detangled and Air-Dryed


After I pressed my hair I braided two semi-loose plaits on each side.. I used satin covered sponge rollers to curl the ends..


Straightened my hair on low-heat... I was going to press my hair from the heat of the stove but chickened-out, I pressed my hair with a plug-in pressing comb on Med/Low.


After my hot shower my hair shrunk and I lost some of the sheen/silky look...


Day 2


Day 3 I'm channeling my inner 1980's chick...mushroom hairstyle!! LOL! It started as a joke, DH loved it so I wore it out like this. Groovy Dude.
========
I enjoyed the "straight" look for the 3-4 days it lasted. LOL! My hair is a 4b so it takes more heat or a higher temp to get the pressed look I was going for. My hair can be resistant to heat but it was very soft and VERY manageable. I will proceed with more confidence next time. I had no idea how to straighten my natural hair because my hair has been permed my whole life. I didn't want to burn my hair off so I was super cautious this time with how much heat I put on my hair. After recently washing my hair my naps are back in full effect!! LOL! Does anyone recommend a flat iron that gets really hot with no damage? I love having options with my hair...I welcome all suggestions..

Friday, September 24, 2010

Sew'd UP!


On a recent Thrift-o-thon I saw these antique sewing machines. I've always wanted to sew my own clothes for many reasons...(1) I have so many ideas swarming around in my head (2) I like being original, I loathe having on the same thing as someone else! (3) MUCH Cheaper!! (4) If I'm good (which I'm sure I would be *wink*) I could make it a source of income... I'm always thinking of ways to save money and make money. These two machines were beautiful and in mint condition! I wrote down the info so I can browse the net and find out how much they are worth. I want to make sure they are not overpriced. You have to watch out...some thrift stores are just as expensive as buying the item new. We shall see...I want these beauties so bad!! Aren't they gorgeous??

Sunday, September 12, 2010

African Dancing Girl Recycled Phone Card Earrings Kenya


Recycled Wire and Phone Card "Dancing Girl" Earrings

Kisumu, Kenya has long been known for atisans who make products from "easily obtained materials", a nice way of saying "trash". Made from discarded scratch off phone cards used to load minutes on cell phones, common in Kenya where there are few of the land telephone lines we take for granted, this novel jewelry reflects the latest environmental vulnerability to hit the developing world. Fair Trade and recycled, it just doesn't get any better.

These darling little dancing girl earrings are made from recycled copper car engine wire, discarded scratch off phone cards and tiny glass beads.

They measure 2.5 inches long from the top of the ear wire and are packaged with the informative card as pictured.

Meet the Artisans
Creative Alternatives trains individual artisans in western Kenya in the art of making crafts from readily available and environmentally sound materials. Water hyacinth weed, tin sheets of misprinted bottle caps, recycled wire, tin cans and discarded phone cards, all find new lives as the artisans of Creative Alternatives creates greeting cards, ornaments, jewelry and functional products which they sell to provide a sustainable livelihood for their families.

Fair Trade means that artisans are paid a fair price in advance for their products and work in safe working conditions. It provides the framework for empowering the disadvantaged of the world to make a fair living and provide for

YOU CAN FIND THESE EARRINGS AND MANY OTHERS ON eBAY::

Seller-elesarexotics

Saturday, August 28, 2010

Hooking up the Crib for FALL!!!...for LESS.


I fell in love with this color arrangement at Target!!! Its warm chocolate with a splash of bold colors!


Paint colors...


comforter set


I love that green and chocolate together...

(Walmart)


------

I have been purging and getting rid of clutter for the past few months. I was on my way to being a hoarder....not like that woman from Oprah a few weeks back, more like an organized clutter. My garage was a mess!! WOW! So after having Salvation Army make 4 trips to my home to pick up all this junk I'm inspired to jazz up my crib (home)... Hubby and I juggled with the idea of buying a new home but we don't want to settle down for 10+ years in this state, we wanna relocate EAST... Stay tuned for that convo...

Anywhoooo...since we are gonna live in this house for another year or so we decided to redo everything while we are here. We are not balling so we are gonna do this on a budget. When we first got married I shopped in places like Pier 1, spending waaaay too much money. After perusing Target and Walmart I started "window shopping" for ideas. I'd snap a pic of color combos and text hubby and he would say YES or NO...so we agreed with the chocolate brown paired with bold colors like; green, turquoise, orange....its a perfect mix of the both of us! Right now grad school has consumed my world but I imagine we will have this job completed by Thanksgiving. It feels good to chunk all of that junk that was taking up space. All that clutter was messing with my mind, now I have clarity and can think! LOL! It's so true what they say about clutter effecting your peace of mind. As I was chunking stuff in the Donate, Sell, and Trash piles I felt liberated! I should have taken BEFORE pics! OMG!
Stay tuned yall!

Wednesday, March 31, 2010

Thursday, December 31, 2009

FOREVER GREEN DIY Project #2


My recent purchases, can't wait to see the finished project. I will post AFTER pics in a few days...

Thursday, December 24, 2009

Making soap that smells sweet enough to eat!

www.hgtv.com


Project by Sharon Kinnier from Baltimore.

Sharon started making her own soap after she realized what ingredients were generally included in the store-bought variety. After much tinkering, she has created a chocolate soap that looks good enough to eat!

Materials:

2 stainless steel pots
scale
2 measuring cups
lye
goggles
surgical mask
gloves
water pitcher
immersion blender
cellophane
2 thermometers
craft sticks
freezer paper
soap mold
old clothes
oils: 40 oz. olive oil, 16 oz. coconut oil, 16 oz. palm oil
8 oz. of shea butter8 oz. of cocoa butter12 oz. lye crystals24-26 oz. water
6 oz. cocoa powder

Steps:
1. Lay out all soap making utensils. Line mold with freezer paper.
2. Measure out any herbs or additives and place nearby.
3. Dissolve lye into pitcher of ice and water and stir.
4. Weigh out hard fats into stainless steel pot. Place pot onto stove and melt fats.
5. Once hard fats are melted, put pot back on scale and measure in remaining oils. Mix.
6. Pour off 16 oz. oil into separate bowl. Mix cocoa powder into this bowl and blend well; set aside.
7. When lye solution and pot of oils are both near 110 F degrees, stir lye solution into pot. Blend with immersion blender; alternate with power on and power off, stirring as if with a spoon.
8. Stir until soap mixture reaches "trace" stage, like thin to medium pudding.
9. Stir in additives, fragrance, or essential oils.
10. Pour into mold.
11. Drizzle the cocoa powder/oils mixture into soap in mold following a vertical pattern up and down.
12. Drag a craft stick throughout the soap, evenly dispersing the chocolate throughout the mold in a marbling pattern.
13. Set the mold aside in a box and cover with another box.
14. When soap shows signs of cooling by becoming opaque at the edges, place a heavy towel over the whole mold to keep warm.

Website: www.Botanicalworks.com
E-mail: skinnier@botanicalworks.com


Sunday, September 27, 2009

How to Make a Natural Exfoliating Bath Bar


Things You'll Need:


*3-4 ounces glycerin melt and pour soap base
*loofah sponge
*soap bar mold
*wooden or metal spoon
*serrated knife
*microwave-safe 2 cup measuring cup
*spray bottle filled with rubbing alcohol
*microwave oven


Making A Natural Beauty Scrub

Step 1
Assemble all your tools and ingredients next to the microwave oven.
Step 2
Chop the glycerin soap base into cubes.
Step 3
Slice the loofah into 1/2" thick slices or chop into little squares approximately 1-2 inches in diameter.
Step 4
Place loofah pieces in the bottom of the soap mold.
Step 5
Pour soap cubes into the measuring cup and heat in the microwave on high for 40 seconds. Stir. Continue to heat and stir the soap base at 10 second intervals until cubes are completely melted.
Step 6
Pour the melted soap from the measuring cup into the mold over the loofah pieces. If the soap begins to harden before you are finished, simply reheat and stir.
Step 7
Allow the soap to set for a minute or so until the bubbles rise to the top. Squirt with rubbing alcohol. This keeps bubbles from forming in the soap so you have a nice clear bar.
Step 8
Allow the soap to cool for about a half hour or until the soap bar has hardened.
Step 9
Turn mold over and pop soap bar out by pressing down on the mold with your thumbs. If the soap bar is stubborn, place mold in the freezer for ten minutes and try again.

Source: www.ehow.com